

Getting started
This page takes you from nothing to a data point you can read back, in six calls. It is deliberately literal: copy each command, replace the placeholders, and you have a working integration by the end.
Everything here is done with curl, so it translates to any language.
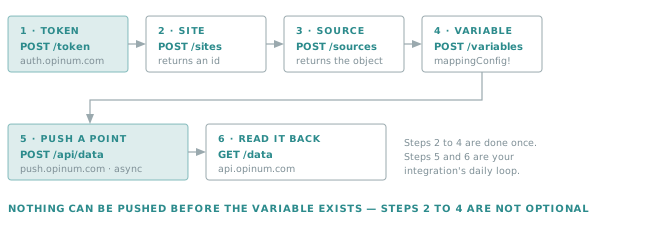
Steps 2 to 4 build the structure and are done once. Steps 5 and 6 are what your integration repeats.
Important
If your sites and sources already exist — created in the interface, or by a master data synchronisation — skip to Step 5. You only need the variable id or the source identifier + mappingConfig pair.
What you need
- A
client_idandclient_secret, from support@opinum.com. - A Insights user with the Data Pusher right, created by a manager of your account.
Details in Connect to the API.
Step 1 — Get a token
curl -s -X POST 'https://auth.opinum.com/realms/opinum/protocol/openid-connect/token' \
  -H 'Content-Type: application/x-www-form-urlencoded' \
  --data-urlencode 'grant_type=password' \
  --data-urlencode 'client_id=YOUR_CLIENT_ID' \
  --data-urlencode 'client_secret=YOUR_CLIENT_SECRET' \
  --data-urlencode 'scope=datahub-api push-data' \
  --data-urlencode 'username=YOUR_USERNAME' \
  --data-urlencode 'password=YOUR_PASSWORD'
The response contains access_token and expires_in. Keep it in a shell variable for the rest of this page:
TOKEN="paste_the_access_token_here"
AUTH=(-H "Authorization: Bearer $TOKEN" -H "Api-Version: 1.7")
Tip
Both scopes are requested here because this walkthrough uses the API and the push service. Asking for
datahub-api alone would make step 5 fail with a 401.
Confirm the token works before going further:
curl -s "${AUTH[@]}" "https://api.opinum.com/sites?DisplayLevel=SiteLight"
A JSON array — even an empty one — means you are connected.
Step 2 — Create a site
A site is the physical place the data comes from.
curl -s -X POST "${AUTH[@]}" -H "Content-Type: application/json" \
  "https://api.opinum.com/sites" \
  -d '{
        "name": "Demo site",
        "typeId": 3,
        "timeZoneId": "Romance Standard Time"
      }'
The response is the new site id, as a bare integer. typeId is a site type — 3 is Office; the 16
values are listed in Site types.
Note
timeZoneId is what every later date is interpreted against when you use UseReportingTimezone. Take a
moment to set it correctly — see Reference data for the list.
Step 3 — Create a source
A source is what produces the data at that site: a meter, a gateway, a feed.
curl -s -X POST "${AUTH[@]}" -H "Content-Type: application/json" \
  "https://api.opinum.com/sources" \
  -d '{
        "name": "Demo meter",
        "siteId": 12345,
        "serialNumber": "DEMO-0001",
        "sourceTypeId": 72,
        "energyTypeId": 1,
        "timeZoneId": "Romance Standard Time"
      }'
The response is the full source object, not just an id — read id from it.
| Field | Value used here | Meaning |
|---|---|---|
sourceTypeId |
72 |
Pushed Data — a source fed through the push API, which is what this walkthrough builds. |
energyTypeId |
1 |
Electricity. |
serialNumber |
DEMO-0001 |
Your own identifier for this meter. |
Important
sourceTypeId and energyTypeId are referential ids, not free values. GET /sourceTypes returns 114
entries and GET /energyTypes returns 27 — pick the one that describes your source rather than reusing the
ids above blindly. See Reference data.
Golden rule
Set a business identifier on the source — a serial number, an EAN, a meter number.
It is what lets your integration find this source again without storing our internal id. An integration keyed on serialNumber survives being pointed at another environment; one keyed on an internal id has to be remapped by hand.
Step 4 — Create a variable
A variable is one measured quantity of that source.
curl -s -X POST "${AUTH[@]}" -H "Content-Type: application/json" \
  "https://api.opinum.com/variables" \
  -d '{
        "name": "General consumption",
        "sourceId": 67890,
        "variableTypeId": 0,
        "unitId": 8,
        "granularity": 1,
        "granularityTimeBase": 3,
        "quantityType": 2,
        "mappingConfig": "general-consumption"
      }'
The response is the new variable id, as a bare integer.
| Field | Value used here | Why it matters |
|---|---|---|
mappingConfig |
general-consumption |
The key the push service uses to pick this variable inside the source. It becomes part of your integration's contract — choose it deliberately. |
variableTypeId |
0 — General consumption |
What the variable measures. |
unitId |
8 — Kilowatt-hour |
The unit the stored values are expressed in. Values are not converted on the way in. |
quantityType |
2 — Integrated |
A consumption over an interval. An index would be 3, Cumulative. |
granularity + granularityTimeBase |
1 + 3 — one hour |
The expected spacing between points: a count, and a time base. |
Important
granularityTimeBase reads from GET /timePeriods (3 = Hour), not from GET /granularity, whose
scale is different — there, 3 means Day. The two are easy to confuse; see
Granularity and time base.
Every id above comes from a referential you can list — see Reference data.
Step 5 — Push a data point
Data points go to push.opinum.com, not to the API.
curl -s -X POST -H "Authorization: Bearer $TOKEN" -H "Content-Type: application/json" \
  "https://push.opinum.com/api/data" \
  -d '[{
        "variableId": 111213,
        "data": [
          { "date": "2026-08-28T10:00:00Z", "value": 12.4 },
          { "date": "2026-08-28T11:00:00Z", "value": 11.8 }
        ]
      }]'
You can also identify the variable without its id, by combining a source identifier with the
mappingConfig — the full matrix is in Standard format:
[{ "sourceSerialNumber": "DEMO-0001", "mappingConfig": "general-consumption",
   "data": [ { "date": "2026-08-28T10:00:00Z", "value": 12.4 } ] }]
Golden rule
A 200 from the push service means accepted, not stored.
Parsing, validation, insertion and aggregation all happen after the response is returned. A payload naming a variable that does not exist is answered with a 200 and then discarded. The webhook is the only way to learn the real outcome — wire it before you trust the pipeline.
Step 6 — Read it back
Give the platform a few seconds, then:
curl -s "${AUTH[@]}" \
  "https://api.opinum.com/data?VariableId=111213\
&DisplayLevel=ValueVariableDateSource\
&Granularity=Raw\
&From=2026-08-28T00:00:00Z&To=2026-08-29T00:00:00Z&IncludeToBoundary=true"
Your two points come back, each with its variableId, date and rawValue.
If the array is empty, work through this list in order:
| Check | How |
|---|---|
| Did the push actually land? | Look at the variable in the Insights interface. |
| Is the variable id right? | GET /variables?SourceId=<id>&DisplayLevel=Verbose |
| Is the window right? | Remember IncludeToBoundary, and that dates are read in the time zone you specify. |
| Is aggregation interfering? | Granularity=Raw returns the stored points untouched. |
| Right account? | A token issued for another account sees nothing. |
Where to go next
- Querying the API — filtering conventions and the full
GET /datareference. - Recipes — the same building blocks applied to real tasks.
- Reference data — the referential ids used in steps 3 and 4.
- Files and triggers — if your data arrives as files rather than as API calls.