
Webhooks
This feature allows users to react to certain Insights events and propagate the relevant information to external systems.
Insights allows clients to either send the information using HTTP or connect to different kinds of queues.
Available events
Users are able to define Webhooks for the following events:
For dedicated feature explanations, use the link in the list below. This page aims at covering the generic webhook feature.
- Alerts notifications
- Alarms notifications
- Data Quality notifications
- MasterData
- Masterdata file process
- Masterdata source and variable
- Source events
- Source creation
- Source modification
- Source deletion
- Standard data file processed
- Data Ingestion
- Report Generation
Security considerations
The CRUD operations are only available for Manager. Users are only able to retrieve the list of configured Webhooks to use them in feature notifications (Alerts, Alarms, Reports, Data Quality).
Please note that certain webhooks are trigerred "account wise". For example, source events will be triggered for all sources, there is no need to configure it anywhere.
The webhook feature will also automatically redact sensitive information such as password. You can declare custom headers / parameters as "secret" using the lock icon, should you need to pass, for example, an API key or other sensitive information.
Sensitive information are therefore not retrievable from the portal or from the API.
Important
This means that as soon as you have any sensitive information configured in a webhook configuration, we highly recommend using the PATCH API to update it as the result of the GET API will contain redacted information and reusing it will same the redacted value and thus break your webhook.
Failures and retry
When an error occurs, the system will automatically retry one time after 10 seconds then 4 times at 10 minutes interval.
If the system encounters 5 errors consecutively, the webhook will be disabled in order. A manager has to fix the issue and can re-enable the webhook manually.
History retention
By default the webhook history is kept for 30 days. The retention period can be configured in hours or days. If the webhook is triggered many times a day, reduce the retention period so that the history is always available and does not overload the system.
Important
When the history is changed, it is applied on new occurences of webhooks, the history is not recovered or flushed.
Communication medium
The webhook feature allows clients to "publish" the notification via different mediums.
Hereunder you'll find a list of the different protocols that Insights supports with the target servers that they have been tested with. Should you choose a different type of server, we cannot guarantee that it will be 100% supported. In such case, please contact our support so we can see how (and if) we can provide help.
HTTP
When using this configuration, webhook payloads will be sent using an HTTP POST request.
The current implementation supports sending the request using no authentication (bare http request) or Basic Authentication.
Alternatively, you can use a custom http request header to pass an authentication parameter such as an API key.
Important
Please consider marking any sensitive information you pass the in request headers as "secret" to ensure it will not be recoverable from the Insights API.
The format field will serve 2 purposes being 1/ to offer syntax highlighting in the Insights interface and 2/ let Insights know that it should be using the application/json or application/xml content-type.
AMQP V10
When using this configuration, webhook payloads will be sent using the AMQP V10 protocol.
This protocol is well know for being supported by a lots of different queuing system vendors among which (not exhaustive):
- RabbitMQ 4.x
- Azure service Bus
- Azure Event Hub
- Amazon MQ
Tip
This configuration was successfully tested with Azure Service Bus and RabbitMQ 4.1.
AMQP V9
When using this configuration, webhook payloads will be sent using the AMQP V9 protocol.
This protocol was added for the specific case of MongoDB 3.X. While most AMQP server offering have nowaday moved to AMQP v10, RabbitMQ 3.X still has a very vast user base.
Tip
This configuration was successfully tested with RabbitMQ 3.9
MQTT
When using this configuration, webhook payloads will be sent using the MQTT protocol.
This protocol is an industry standard for IoT, specifically design around lightweight publish/subscribe principles.
More info: https://mqtt.org/
Example of know MQTT supported services:
- Mosquitto
- Hive MQ
- Azure Event Grid
- Azure IoT Hub
- AWS IoT Core
- GCP Pub/Sub
Tip
This configuration was successfully tested with HiveMQ 4.45 and Mosquitto 2.0
Kafka
When using this configuration, webhook payloads will be sent using the Apache Kafka protocol.
More info: https://kafka.apache.org/
Tip
This configuration was successfully tested with Kafka 3.4
User Interface Components
Account Settings

The configuration of the webhooks is done in the Account settings page. The webhook tab contains the list of webhooks and a button to create new ones. The table displays the following fields:
- The name of the webhook. Displayed as a link that opens the popup to edit the webhook
- Event Type: shows if the webhook is for Alert or Data Quality
- History: shows the amount of successful and/or failed calls to the webhooks in the retention period defined on each webhooks. By default the retention period is set to 30 days. After the retention period the call history is automatically deleted. The value is a link as soon as there is effectively some history to open the history modal.
- History retention period: shows the retention period of the webhooks, in hours or days. The maximum retention is 30 days.
- State: shows if the webhook is enabled or disabled. Not that a webhook can be disabled by the system if it fails 5 time consecutively
When you select one or multiple webhooks in the table, you will be able to:
- Enable one or multiple webhooks
- Disable one or multiple webhooks
- Copy one or multiple webhooks
- Delete one or multiple webhooks
Webhook
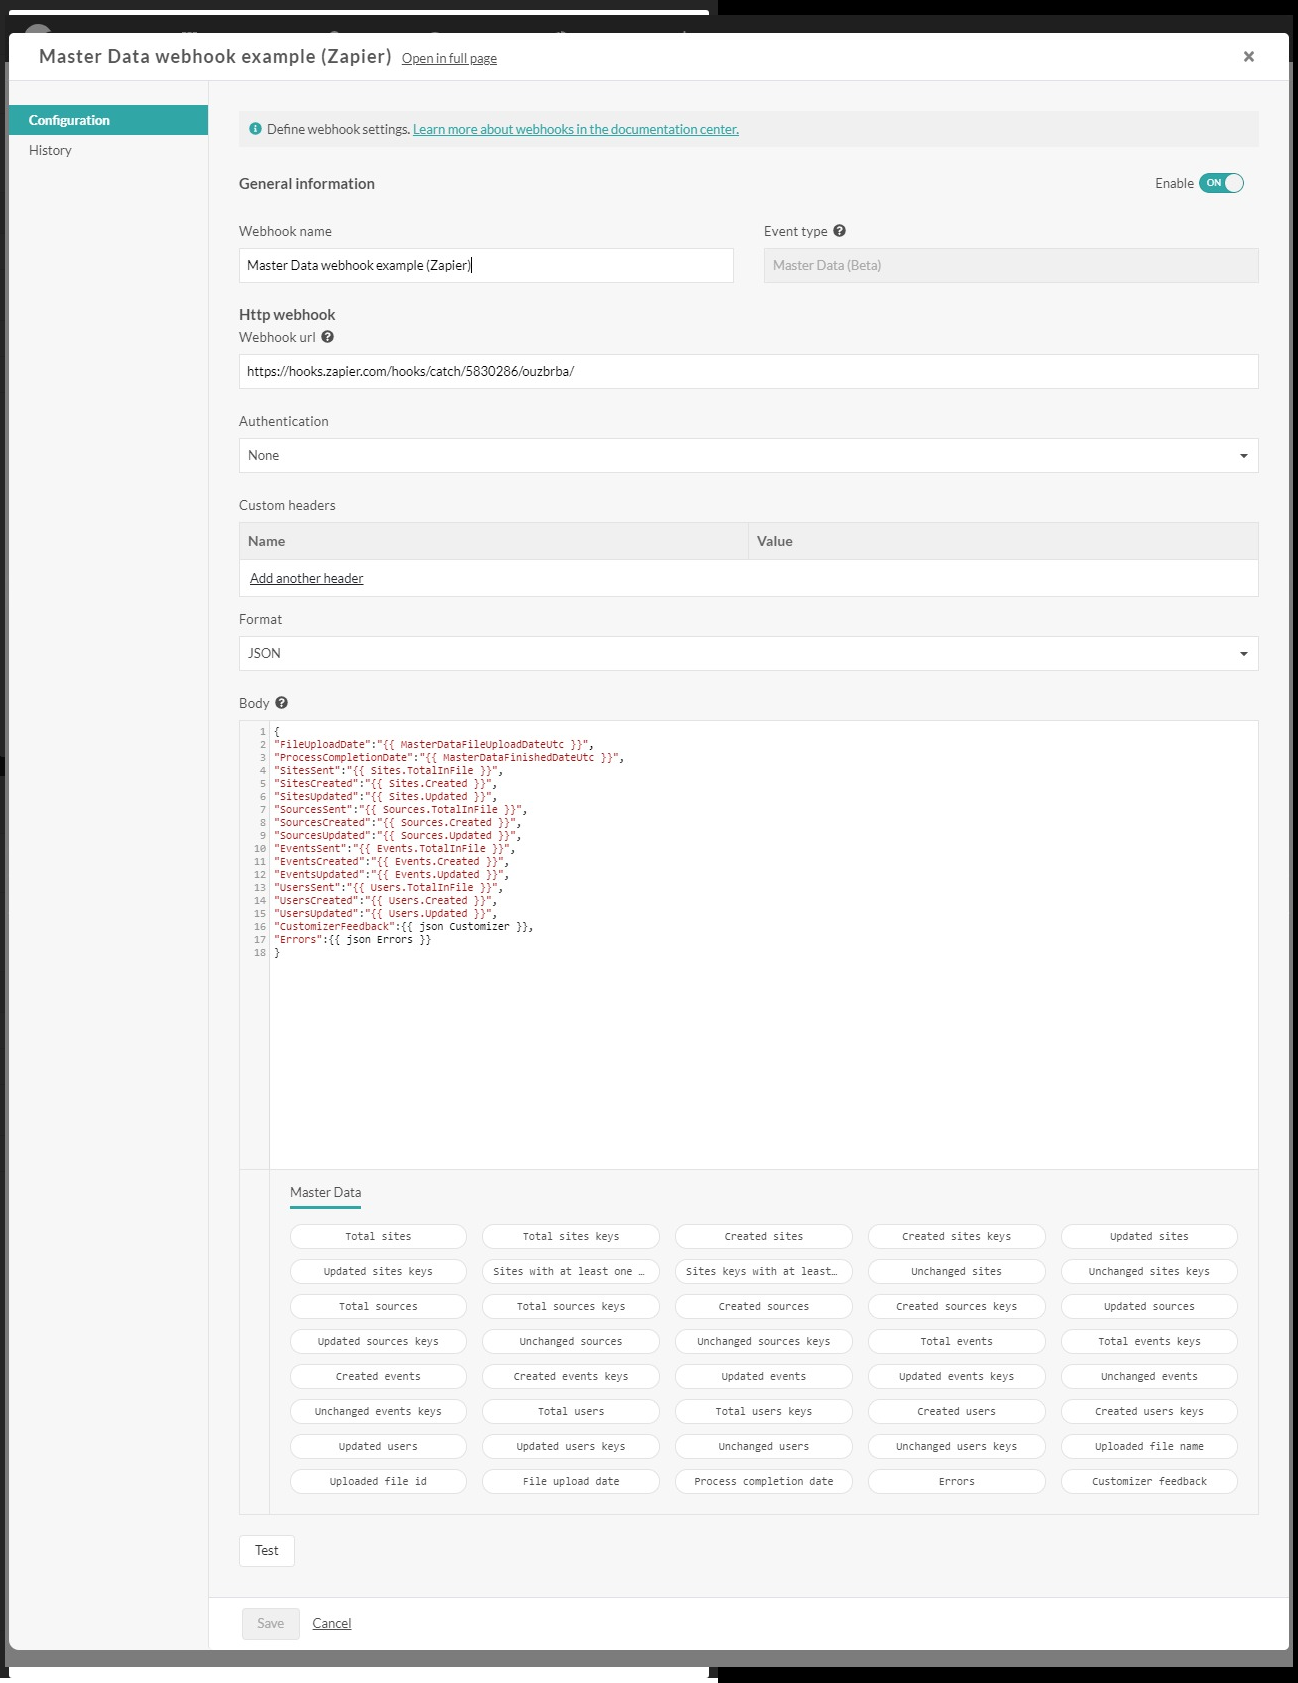
The popup lets you specify the information that we need to perform the HTTP request.
In terms of authentication, we only support Basic authentication (or no authentication at all).
A custom header can be added, and its content can be protected and hidden for security reason.
You can also choose to send the data in JSON or XML. In this case the body editor will use the proper syntax highlight and the according Content-Type header will be set on the request.
Below the body editor is a list, organized by entity, of the different fields placeholders that you can add on the body. To add a field, position the cursor where you want in the body and click on the corresponding button.
Finally, there is a test button that allows you to validate your configuration before saving.
Secret header
The effect of this flag in the custom header is to declare a header value as sensitive, with the consequence that once the value has been saved in the API, it will no longer be possible to retrieve it. This same concept has been applied to the “password” authentication field.
As a result, from the moment you start using secret headers, you'll need to pay particular attention to how you apply modifications to them. The PUT is still available, but it requires the various secret values to be specified. These values are no longer available when retrieving a Webhook via the GET endpoint. We've therefore added a PATCH endpoint that must be used for all partial updates. The same principle applies to the test endpoint.
In parallel, webhook execution histories are now obfuscated to hide secret field values.
These changes have been made to enhance the platform's security and ensure that secret field values are not available to unauthorized users.
History
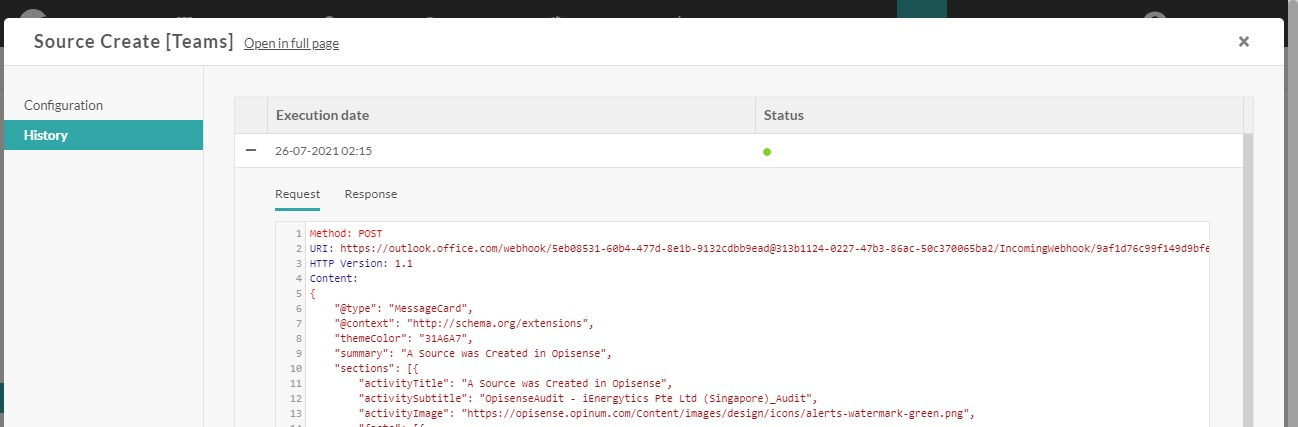
That popup lets you see the execution history of the webhooks for the last 30 days.
For each line on the left, you can see the request and the response
API Definition
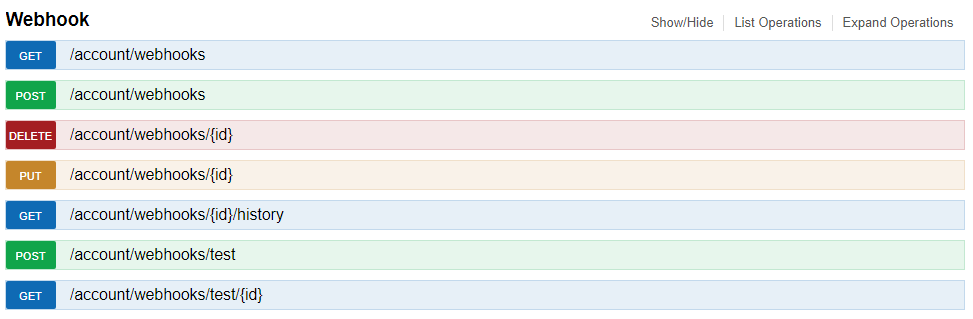
The API contains all the operations that can be done through the UI.
Special note on the test endpoints. When you create a test with the POST, the API returns an ID that should be used in the GET which will either return 204 (No Content) if the test has not been executed yet or a object that is similar to a webhook history.